The steel joints data can be added to the printout report that was created in Part 1. To open this document, double-click the 1 item in the Printout Reports category of the 'Navigator - Data'.
In the printout report, open the 'Printout Report Manager' by clicking the
![]() button on the toolbar (second from the right). Alternatively, select Edit Printout Report on the Edit menu.
button on the toolbar (second from the right). Alternatively, select Edit Printout Report on the Edit menu.
Activate the Steel Joint Design report item folder to include the design data. Then click Save and Show.
Chapter 9 of the printout report contains the default data of the connection design.
Chapter 9.5.2 contains the classification, Chapter 9.6.1 the design ratios of each steel joint type.
Adjusting the Contents
To add or remove a chapter, you can use the 'Printout Report Manager' as described in Part 1. Right-click the 9.6 Results chapter, for example (1), to open the shortcut menu of this chapter. There select the Edit option (2).
In the 'Printout Report Manager', the 'Results' category of the steel joint design is set in the 'Report Items' area. Activate the Design Ratio on Steel Joints by Design Situation and Design Ratio on Steel Joints by Node check boxes, for example, to add those results to the printout report.
Click Save and Show to close the 'Printout Report Manager' and update the printout report.
The graphics of steel joint no. 2 that you have printed in the 'Results in Steel Joint' window (see the Preview of Graphic Printout image) are placed at the end of Chapter 9. If you want, you can drag that item to another location, for example to Chapter 9.6.3.
Printing Graphics
To add an image to the printout report, minimize the preview window by clicking the
![]() button on the 'Printout Report' title bar. The RFEM workspace reappears showing the steel joint of the corner node (see the
Design Ratios of Fasteners and Welds
image). Rotate and zoom the model for a good view of the connection.
button on the 'Printout Report' title bar. The RFEM workspace reappears showing the steel joint of the corner node (see the
Design Ratios of Fasteners and Welds
image). Rotate and zoom the model for a good view of the connection.
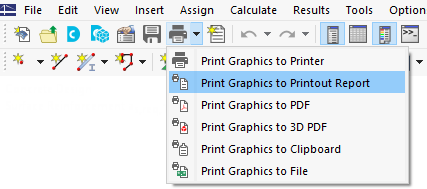
To print this image, click the
![]() button next to the
button next to the
![]() button on the toolbar. A list of printing options is opened. Click Print Graphics to Printout Report.
button on the toolbar. A list of printing options is opened. Click Print Graphics to Printout Report.
The preview of the image is presented with some options to adjust the layout.
Select the Custom Name check box in the 'Picture Settings' area (1). Then enter Corner node in the text box to the right to replace the default title. Make sure that As screen view is set in the 'Graphic Pictures' area (2).
In the 'Graphic Picture Size and Rotation' area, select the Height option so that you can define the vertical size of the image (3). Enter the Height Ratio of 50%, which means that only half of the page is used. Then click Save and Show.
The printout report is created again with the image on the last page of the 'Steel Joints' chapter.
Finally, close the printout report by clicking the
![]() button.
button.
You have now completed the connection design part of the tutorial. Save the data by clicking the
![]() button on the toolbar.
button on the toolbar.


