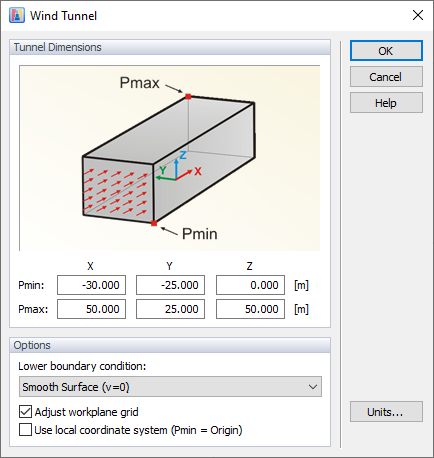
You can modify the dimensions of the wind tunnel in a dialog box or graphically. To open the dialog box, double-click the "Wind Tunnel" item in the "Data Navigator," or open the "Edit menu," point to "Wind Tunnel," and select "Edit Wind Tunnel."
The size of the wind tunnel is defined by means of six parameters; the dimensions in X, Y, and Z refer to the origin of the model. The
![]() button enables you to set the size to the default dimensions. Depending on the model type (open framework or closed surfaces), they are determined from the YZ-projected area of the model. The "free space" around the model – which in reality is unlimited – is then set large enough with respect to that projected area.
button enables you to set the size to the default dimensions. Depending on the model type (open framework or closed surfaces), they are determined from the YZ-projected area of the model. The "free space" around the model – which in reality is unlimited – is then set large enough with respect to that projected area.
To modify the wind tunnel graphically, click the "Resize Wind Tunnel" item in the panel. Make sure that the "Model" tab of the work window is set.
In the same way as described above, it is possible to enter the dimensions of the wind tunnel in the "Edit Bar" panel. Additionally, you can modify its size in the work window by selecting one of the arrows and moving it. The corresponding parameters are updated in the panel.
When you hold the [Shift] key while moving an arrow, the wind tunnel is modified symmetrically in the respective direction. By holding the [Ctrl] key, you can scale the wind tunnel up or down uniformly in all three directions.


