Para obtener los mejores resultados de nuestra simulación numérica, es una buena idea comprobar algunas cosas importantes antes de ejecutar el cálculo, que se analizan en las siguientes subsecciones.
Detection de superposición Triangles
El modelo original puede contener "triángulos dobles", es decir, triángulos superpuestos que se encuentran en el mismo plano, consulte la imagen a continuación.
Los triángulos superpuestos pueden conducir a resultados erróneos, porque la presión resultante se puede extrapolar a todos estos triángulos y la fuerza de arrastre total que actúa sobre el modelo se puede aumentar por eso. La comprobación de triángulos superpuestos se activa automáticamente después de la importación del modelo (consulte el capítulo Importar modelos) o se puede ejecutar manualmente desde el menú, consulte la Imagen a continuación.
Al hacer clic en la comprobación del modelo, se abrirá una nueva ventana donde encontrará la conclusión e información sobre el número de triángulos superpuestos y su área.
Los datos del modelo de triángulos superpuestos se pueden exportar a un archivo y luego mostrar y examinar en ParaView.
Túnel de viento
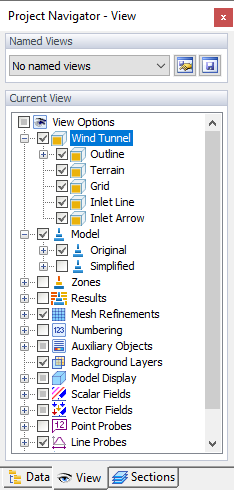
El contorno del túnel de viento se muestra como un cuadro alrededor del modelo en su centro. Puede comprobar la dirección del viento, que se simboliza con una gran flecha roja. En el "Navegador de proyectos", hay varias opciones disponibles para mostrar ciertos elementos relevantes para el túnel de viento (consulte la imagen Navegador de proyectos). El nivel del terreno resulta del valor definido en la sección "Propiedades del modelo" de la ventana "Datos generales".
Si es necesario, puede ajustar el tamaño y la posición del túnel de viento gráficamente o en el cuadro de diálogo "Túnel de viento" (consulte el capítulo Túnel de viento). Asegúrese de que haya suficiente espacio en todos los lados del modelo para que el aire fluya sin obstáculos.
aberturas
Si ha seleccionado la opción "Cerrar huecos" (consulte la sección Configuración de malla), puede comprobar si los huecos o huecos están adecuadamente cerrados en el modelo de RWIND 3. Si es necesario, puede modificar la configuración en la imagen Inspector de malla cuadro de diálogo de RWIND 3. Tenga en cuenta que hará una diferencia considerable para el análisis si el aire puede fluir a través de una abertura o no.
Modelo original
El modelo original es un modelo creado en RFEM 6/RSTAB 9, importado desde un archivo externo o creado en el Editor de modelos en RWIND 3. La superficie exterior del modelo (cáscara exterior) es la parte más importante para la aerodinámica externa. Antes del cálculo, la superficie exterior del modelo se divide en triángulos. La triangulación de la superficie del modelo es la base para la creación del modelo simplificado utilizando una malla de envoltura retráctil, el modelo simplificado es la base para la generación de la malla de volumen finito en el espacio alrededor del modelo. El cálculo numérico se realiza en esta malla de volumen finito. Aunque una de las grandes ventajas de RWIND 3 es la posibilidad de utilizar un modelo simplificado (envoltura retráctil), que elimina la mayoría de los problemas potenciales, cada cálculo numérico debe ir precedido de al menos una comprobación rápida de la exactitud de la geometría del modelo original.
Antes de iniciar la simulación, debemos comprobar la geometría del modelo original para asegurarnos de que no sea demasiado complejo para nuestro propósito y que no contenga partes innecesarias del modelo (por ejemplo, superficies internas, particiones, etc.) que no son importantes para nuestra simulación numérica (aerodinámica externa). Las superficies internas en un modelo cerrado (volumen cerrado) aumentan los requisitos computacionales en términos de datos y tiempo, y pueden conducir a imprecisiones. Cuanto más compleja sea la geometría, más tiempo se debe dedicar a comprobar la malla del modelo original y la malla de volumen finito generada. Para este propósito, el Inspector de malla se utiliza la herramienta.
Modelo simplificado
RWIND 3 presenta un "Modelo simplificado", que se crea a partir del modelo original de RFEM 6/RSTAB 9. Representa una malla especial para definir el contorno del modelo (consulte el capítulo Malla computacional y simplificación del modelo para obtener más información).
Puede visualizar el modelo simplificado de la siguiente manera:
- Seleccione la opción "Mostrar modelo simplificado" en el panel.
- Seleccione la opción "Simplificado" en el "Navegador Ver" para la visualización del modelo.
El grado de simplificación se controla mediante el "Nivel de detalle" especificado en el cuadro de diálogo "Editar modelo". El capítulo "General" incluye un ejemplo que muestra los efectos de este valor en el proceso de "reducción" aplicado al modelo. Si los contornos no se representan correctamente, puede ajustar el nivel. Al hacer clic en
![]() en el
Inspector de malla
cuadro de diálogo, puede comprobar inmediatamente las modificaciones y ver el nuevo modelo simplificado. Tenga en cuenta que un modelo muy detallado requerirá más tiempo de cálculo.
en el
Inspector de malla
cuadro de diálogo, puede comprobar inmediatamente las modificaciones y ver el nuevo modelo simplificado. Tenga en cuenta que un modelo muy detallado requerirá más tiempo de cálculo.


