To model the splice, various base objects were used in RFEM. In addition to the types and options for lines, surfaces, and solids described here, there are a few other functions that can be found in the RFEM Manual.
Creating Line
Use the
![]() button to create a new line. For the input, it is sufficient to click on the start and end point of the line in the working plane.
button to create a new line. For the input, it is sufficient to click on the start and end point of the line in the working plane.
First, use the "Single Line" type to create a square with an open right side. Then, switch to the "Arch"' type and thus close the right side.
Creating Surface
Now, you can use the created lines as a boundary for a surface. To do this, use the "Select Boundary" surface type.
First, create a surface with a thickness of 1 mm and the "Standard" stiffness type. After extruding a solid from it, the stiffness type automatically changes to "No Thickness".
Create a new thickness by clicking
![]() and assign a material to it. For this, you can utilize the material library available in RFEM 6; click
and assign a material to it. For this, you can utilize the material library available in RFEM 6; click
![]() to open it. In the webinar, we use S235 steel.
to open it. In the webinar, we use S235 steel.
Finally, you should select the lines that will serve as the surface boundary.
Opening
To create a circular opening in the surface, use the "Circle" option by clicking the
![]() button. As an annulus, select [X: 10 cm / Y: 0 cm / Z: -5 cm], and a radius of 2 cm. Right-click to complete the input.
button. As an annulus, select [X: 10 cm / Y: 0 cm / Z: -5 cm], and a radius of 2 cm. Right-click to complete the input.
The next step is to divide the boundary line of the opening in order to simplify the modeling of the contact solids later on. To do this, create an additional node at the topmost point of the circle in the Z-direction. Select the opening with both nodes and then divide the circular line using the
![]() button.
button.
Generating Solid
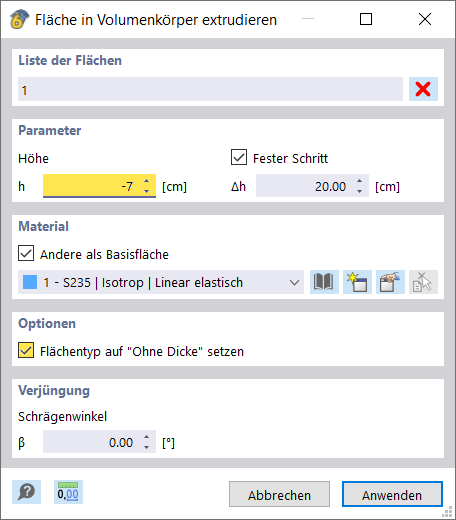
A simple way of enlarging a surface into a solid is the "Extrude" function that you can find in the surface shortcut menu.
In the corresponding dialog box, specify the height of the solid. For example, the splice should be 7 cm wide. It is also useful to set the "Surface Type" option to "Without Thickness" to ensure that the surface is only used as a boundary for the solid.


